
Pool Cue Design

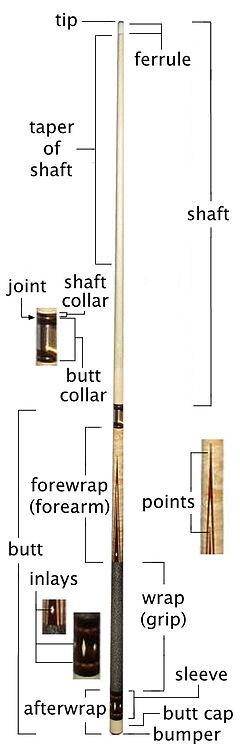
The diagram above is taken from Pearson Cues giving the major components of a pool cue. Well, it shows the butt of the cue without the shaft. This is the part I plan to make.
The diagram to the right is another description, this one from Wikipedia. It shows many of the same parts of the cue but includes the shaft. My plan is to make the "butt" and purchase a low deflection shaft for it. The butt is made mainly of the forearm and what I think of as the "handle" (wrap, sleeve and butt cap).
The structure of the forearm, front half of the butt, is one piece. The "handle" is also structurally made of one piece. These are connected together to form the butt. This connection is termed the "A-joint" and is permanent. The "joint" of the cue connects the butt to the shaft and is usually disconnected for storage and transport.
As above, the forearm connects to the shaft, usually through a threaded pin embedded in the forearm. Backing up this pin is a collar and possibly one or more rings. Rings are mostly for decoration. Alignment of the forearm and shaft can be done in several ways. A boss on the pin collar can match a recess on the shaft. The boss can be part of the pin itself. Also tight fitting thread can be used for alignment, as well as other schemes.
The bottom end the forearm connects to the "handle", likely with one or more rings. The A-joint is formed with a tenon between the forearm and "handle". The tenon is cut on the "handle" and fits into a bored hole in the forearm. Usually a metal stud threads into both and pulls them together. Along with glue, like epoxy, it is a permanent joint.
The "handle" extends from the A-joint through to the butt cap. The wrap/grip portion is usually covered with linen string or leather where one holds the cue. A recess is cut along this section so the handle material is flush with the outside of the cue. A tenon is cut on the bottom end of the "handle" onto which the butt sleeve, rings, and butt cap are fitted and glued in place, with or without a joining screw.
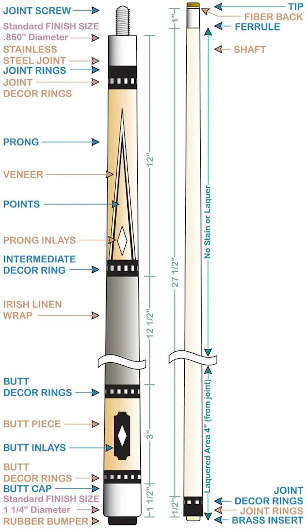
Another description below is from Prather Cues . I found this very useful since it gives the internals of the cue. The dimensions of the tenons and metal parts are about right for my design. Thus, I followed the second diagram below fairly closely. Another indication the sizes are common, is the ability to buy ready made rings that fit these tenon sizes.
 |
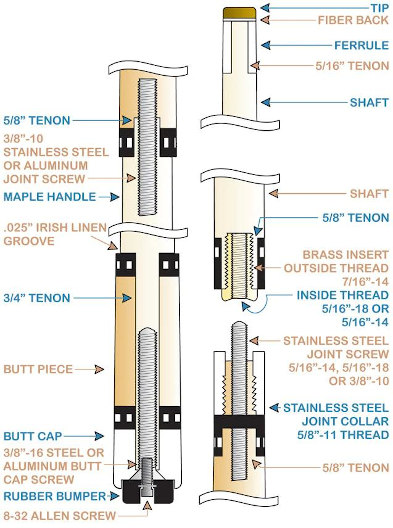 |
There is typically a bumper at the base of the cue. It is usually held on with a screw of some kind. My inexpensive cue just uses a wood screw. The diagram from Prather shows a machine screw holding it onto another aluminum flat head screw. It is common, on nicer cues, to have weight screws/bolts that fit into the base of the butt, similar to the aluminum screw shown by Prather. The weight and balance of the cue can be adjusted by changing the length and material used in this weight bolt.
I haven't yet mentioned "points". These are shown on the diagrams above, a very traditional element of pool cues. The inexpensive cue I have has points just painted on. Real points are integrated into the cue forearm, and sometimes also the butt sleeve. They are installed by cutting a V into the forearm, a cut starting from nothing at the front and going deeper as the cut progresses back to the end of the forearm. This 90 degree V is filled with, usually, wood. When the forearm is again turned round most of this added wood is removed leaving just the point. Most times thin colored veneers are inserted between the point wood and the forearm. This gives thin bands of color adding interest to the points. There are usually four or six points on a forearm though this varies.
Another traditional decoration on pool cues is inlays. Here a recess is cut into the cue and a differing material (wood, ivory, plastic, etc) is glued in. When the cue is again cut round the inlays are flush with the surface. These can be very intricate and quickly increase the cost of a cue. Traditionally done by hand, matching the recess with the cut inlay is a real art. The better the fit between the two the nicer the appearance. It is now most common to cut the recess and inlay using CNC equipment. The trick with CNC is getting nice sharp corners on the recess and the inlay. This leads to very small diameter, easily broken endmills. The recesses in this process are flat bottomed, otherwise the inlay could not be put in place. i.e. No CNC fourth axis is typically needed. Engraving also has a place in cue making.
This is a brief overview of basic cue design. Many other options and variations are possible. Cues are functional but also a piece of art with options and methods being endless. However this seems to be the basics without getting into materials and dimensions. I'll cover the materials and variations I use on particular cues. But please note, I have little or no experience building cues, this is all from my research rather than personal experience. Your mileage may vary.
Cues : Main Page Tooling