#3 SWB Recumbent

The following describes our current short wheel base (SWB) recumbent bicycles designed to collapse for transport. The bikes are for touring rather than commuting as the time required to collapse and pack them is too great for commuting. We've used them for extended tours where we fly to a destination and store the suitcases while biking. We've also used soft sided cases, which we can fold and take with us while touring. These are good for employing a bus or train to 'jump' during a tour.
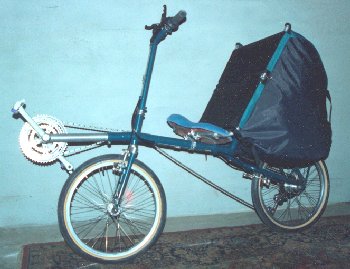
The picture above (Figure 1) shows my bike loaded for touring and Figure 2 shows it without its bag. It's a standard design with 20 inch wheels front and rear. Table 1 gives detailed specifications. As seen in Figure 2 the frame was extended to support its bag rather than installing a rear rack. This was done for added frame rigidity and a smaller packed size.
The first step in disassembly is to remove the pedals and chain. I've found that it's easiest to 'break' the chain than try to leave it together. Next the front boom is removed. Figure 3 shows the front of the bike with the boom removed. As with many recumbents, the front boom is a sliding fit into a second tube that acts as a split clamp. This is the same attachment method used at the seat tube/seat post on diamond frame bikes. In Figure 3 you can also see the fork crown which is a three way split collar (similar to some Mt. bike suspension fork crowns). Also the clamping bolt holding the handlebar stem to the steerer tube can be seen.
The cables are disconnected with attachments very similar to those used on a Moulton. Figure 4 shows two of these, the forward one connected and the rearward disconnected. This figure also gives a good view of the quick release seat clamp and, again, the front fork and crown.
Once the cables are disconnected the stem and fork can be removed. The stem and handlebars come off as one unit. The fork however comes off the steerer and then separates into the crown and two fork blades.
Figure 5 shows the rear of the frame at this point. The rear supports hold the 'rack' tube up and the bag away from the wheel. The forward supports are structural. These supports are attached with allen bolts and they are removed next. The 'rack' tube is a sliding fit at the seat tube and uses the same connection as the boom. Figure 6 shows the frame at this point.
All that remains is to remove the chain stays and seat tube. They are both held with clamps again similar to the boom. The chain stays are made using unicrown fork blades and looks somewhat like a fork when removed.
The disassembled bike is shown in Figure 7 and Figure 8. The second, Figure 8 shows the seat in a disassembled state. It can be seen on the bike in Figure 2. It is an aluminum frame with a mesh back and solid, fiberglass, seat.
It's more fun to tour with someone so, Figure9 and Figure 10 show my wife's bike. It's of the same design but for the seat, she prefers the Tour Easy seat shown. Because of this she's using a Blackburn rack and standard panniers. This makes packing a little harder and requires an extra bag for the seat. For touring this isn't a problem since we have extra bags anyway.
The parts fit into a large size suitcase. We've traveled with these bikes on airlines, buses and trains with little trouble. If we don't have too much luggage its safest to use foam inserts that have been cut out to accept the bike parts, similar to a case and foam used for camera equipment. When touring we pack clothes and camping gear around the parts. We've also used soft cases which can be carried while touring but I'm worried for the bikes each time we do this. Our suitcases have wheels on them and we can 'roll' all our touring gear through airports. However, the soft bags don't have wheels and neither of us can carry 65 lb of gear and 35 lb of bike at one time.
It takes some 20 minutes to disassemble the bike and another 15 minutes or so to pack it. About 10 minutes to un-pack and another 30 minutes to re-assemble. A Brompton it ain't.
One problem I've noticed is that the cables are vulnerable when exposed. It would be difficult to implement, but a 'holder' to keep the cables in place when detached may be worthwhile. The Twosday tandems have something similar to this.
A second problem is having so many pieces when disassembled. This makes packing and carrying more difficult, particularly with the soft sided bags. It may be feasible to re-assemble the bike into a 'traveling' configuration. This would involve 'braze-ons' to bolt or clip the parts back together into a compact package.
These bikes are a success for their intended purpose. It does take some time to pack or un-pack but that's OK on a tour lasting a week or more. The bike design wasn't compromised for collapsibiltiy other than a little weight at the joints. They do allow us to travel through airports and on busses & trains with less trouble.
If you have comments or suggestions please send an e-Mail. I'd be particularly interested to hear from others doing similar bikes.
